Did you know you can summon heat exceeding 800 degrees using only two sticks?
Prompted by NerdSip Explorer #1450
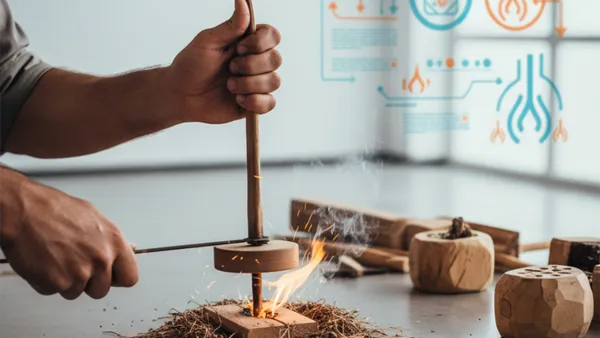
Master the physics and technique of the bow drill to create fire from raw wood.
Creating fire from raw wood isn't magic; it is pure thermodynamics. When you rub two sticks together, you are converting kinetic energy—the mechanical work you put in—into thermal energy. In physics, work is defined as force multiplied by distance ($W = F \times d$). By maximizing both the downward pressure (force) and the rotational movement (distance), you generate intense friction.
To summon fire, your goal is to grind the wood into a fine, charred dust and heat it to its auto-ignition temperature. For most suitable woods, this threshold sits around roughly 800°F (about 425°C). Below this temperature, the wood dust will simply produce a bit of smoke and cool down. But cross that 800-degree threshold, and the char will start to glow on its own, creating a self-sustaining ember.
Your entire objective with the bow drill is to act as an efficient human engine, concentrating all your mechanical energy into one tiny point on a wooden board until it reaches 800 degrees.
Key Takeaway
Fire by friction is achieved by converting mechanical work into focused thermal energy to reach roughly 800°F.
Test Your Knowledge
What is the approximate temperature required to achieve auto-ignition in wood dust?
To harness that 800-degree heat, you need a mechanical advantage. The bow drill is a primitive machine consisting of four essential parts, plus an ember pan to catch your prize.
First is the Spindle (or drill), a straight wooden cylinder that acts as the friction bit. Second is the Hearth Board, a flat piece of wood where the spindle spins to create the hot dust. Third is the Bow, strung with sturdy cordage. The string wraps around the spindle, translating your back-and-forth arm motion into rapid rotational speed.
Finally, you need a Bearing Block (or socket). This is held in your top hand to press down firmly on the spindle. It can be made of hardwood, stone, or bone. Beneath the hearth board, you place a simple leaf or bark strip—the Ember Pan—to catch the hot dust as it accumulates. Together, these tools give you the speed and pressure impossible to achieve with bare hands.
Key Takeaway
The bow drill relies on four main components to multiply your physical effort and generate extreme friction.
Test Your Knowledge
Which component is responsible for applying downward pressure on the spindle?
You might assume that the hardest woods create the most friction, but in friction fire, hardwood is often your enemy. Attempting to drill into oak or hickory will quickly exhaust you, as the dense fibers refuse to grind into dust. Furthermore, denser woods require higher temperatures to reach ignition.
Instead, the secret lies in dry, dead, semisoft woods. Exceptional choices include cedar, basswood, willow, cottonwood, and poplar. These woods are porous and slightly spongy. When rubbed together, they easily grind away into a fine, fluffy powder.
This fluffy texture is critical. Softwood dust acts as an excellent thermal insulator. As the dark char gathers, its porous structure traps the heat you are generating, preventing it from escaping into the air. By using a semisoft wood for both the spindle and the hearth board, you produce maximum dust with minimal effort, allowing the pile to rapidly climb toward that 800°F threshold.
Key Takeaway
Semisoft, dry woods are preferred because they grind away easily and create a highly insulating dust.
Test Your Knowledge
Why are semisoft woods preferred over hardwoods for the hearth board and spindle?
With the right wood selected, it is time to shape the engine. The spindle requires two distinct ends to manage friction. The top end—which sits inside the bearing block—should be carved into a sharp pencil-like point to minimize friction. The bottom end, however, should be a blunt, rounded shape to maximize contact and friction against the hearth board.
On the hearth board, you carve a small starting depression for the spindle. But the most vital feature is the "V" notch. Once you've burned a preliminary hole, you must cut a pie-shaped wedge (roughly 45 degrees) from the edge of the board directly into the center of the depression.
This notch is the incubator for your fire. As the spindle grinds, the hot, charred dust falls out of the depression and collects neatly in the "V" notch. The walls of the notch hold the dust in a compact pile, insulating the core so the temperature can continuously build until it ignites.
Key Takeaway
Maximize friction at the bottom of your spindle and minimize it at the top, while using a "V" notch to collect and insulate the hot dust.
Test Your Knowledge
What is the primary purpose of the "V" notch cut into the hearth board?
Friction fire is a biomechanical puzzle. If your body wobbles, your kinetic energy is wasted. Perfect posture ensures every ounce of your effort translates directly into the spindle.
Start by kneeling. Place the foot of your non-dominant side firmly on the hearth board, as close to the spindle as possible without crowding it. Your non-dominant hand holds the bearing block. Crucially, you must lock the wrist of your bearing hand securely against your shin or knee. This creates a rigid structural frame that prevents the spindle from kicking out.
With your dominant hand, hold the end of the bow. Begin with long, smooth strokes, using the entire length of the bowstring. This maximizes the spindle's rotation. Start slowly to build up dust, then gradually increase your speed and downward pressure. Remember to breathe! Creating an ember is an endurance event, and oxygenating your muscles is just as important as heating the wood.
Key Takeaway
Locking your bearing-block hand against your shin ensures a rigid frame, translating your bowing energy into smooth, continuous friction.
Test Your Knowledge
How should you stabilize the hand holding the bearing block?
As you bow steadily, you will experience the phases of ember birth. First, you will see a light, wispy smoke accompanied by brown dust. Do not rush; keep your rhythm steady to build a substantial pile of dust in the "V" notch.
Eventually, the dust will turn from brown to deep black, and the smoke will change. It will become thick, heavy, and billow upwards in dense clouds. This is the critical moment. Increase your bowing speed and downward pressure, giving it maximum effort for another 15 to 20 strokes to push the core temperature over the edge.
Stop bowing and carefully lift the spindle away. Look closely at the pile of black dust in the notch. If it continues to smoke continuously on its own, congratulations—you have achieved auto-ignition! You have an ember. There is no need to panic or rush. A good ember can safely smolder in its dust pile for several minutes.
Key Takeaway
Don't rush the process; wait for the dust to turn black and smoke continuously on its own before stopping your bowing.
Test Your Knowledge
What is the clearest visual sign that you have successfully created a self-sustaining ember?
You have a smoldering coal, but an ember is not yet a fire. To summon flames, you must introduce the "breath of life."
Before you even start bowing, you should prepare a tinder bundle. This acts as an artificial bird's nest, made from highly combustible, fibrous materials like dry grass, shredded inner bark, or frayed jute twine. Gently tap your hearth board to free the ember, allowing it to drop fully onto your ember pan (a leaf or bark strip).
Carefully slide the glowing ember into the center of your tinder bundle. Fold the fibers gently around the coal, wrapping it up like a taco while leaving an opening for airflow. Hold the bundle up in front of your face and blow smoothly and steadily into the core. As the oxygen feeds the heat, the smoke will thicken dramatically. Keep blowing steadily until the entire bundle suddenly erupts into glorious flames!
Key Takeaway
A glowing ember needs a steady supply of oxygen and a nest of fine, dry tinder to graduate from a coal into a roaring flame.
Test Your Knowledge
What should you do immediately after placing the ember into the tinder bundle?
Track your progress, earn XP, and compete on leaderboards. Download NerdSip to start learning.